Sunday, July 10, 2016

Back to My First Love

I started my current craft journey (in the 21st century) as a scrapbooker.  I used this as my creative outlet, producing pages for my daughter and our family vacations.  My first luv gave way to my exploration of mixed media and assemblage and of course developing projects for my many paper crafting classes.

Last week I unexpectedly became a great aunt.  Yes I knew the event was coming but with a mid-September due date, I thought I had plenty of time to create something for my niece and nephew. However, Joshua decided to make his entrance early.

Since my niece is herself a crafter and scrapbooker, I knew she would appreciate a personalized album and have the time to work on it while waiting for him to come home.  Hence I return to my first luv...creating mini albums.  I love the process of creating lots of empty pages with all sorts of pop-ups and outs and tons of kitschy embellishments.  And did I mention, I get to use stuff from my stash.

PS...I didn't have much in the way of baby embellishments so I HAD to go shopping.  Very disappointing to see how little J's, M's and HL in the scrapping section.
.
Mom and Dad have their own pages

Thursday, July 7, 2016

Rescued Canvas

You know how those painting parties go?  There is a single sample and everyone is supposed to follow the directions to create one similar to the example.  NOT!  First of all, I hardly ever create anything is just two hours.  And secondly, FLAT is not my real style.  AND did I mention you are supposed to copy the sample.  Needless to say my first and only paint party experience was less than fun.  My friends have done a variety of things with theirs from hiding in a closet to hanging in the garage.  You know who you are.

After looking at this canvas just sitting in the pile, I knew that whatever I did to it had to be better than its current state.  The inspiration for this piece was the colorful freebie sunglasses that we had been collecting and the Jimmy Cliff song, I Can See Clearly Now.  And when I found that some sentiment in an advertisement...it was a go.  And then there was the beautiful Graphic 45 Paper, Typography (no longer available).  Love the bright colors.  Gotta say...this piece was just pure fun.

Wednesday, July 6, 2016

A Little Something Different

Last year I had the pleasure to work with Lynne Larkin and learn her technique for creating some amazing boards.  Well it's been a long time coming but I've been wanting to make more.  At first I just couldn't get the technique and product down.  With Lynne's help I corrected that and then there was the time factor.


These painted boards are 6 x 24" with collaged papers, ephemera and pictures adhered to them.   The key, I think, is the painted vintage image. Once a suitable copyright free image is found, it needs to be printed as a high contrast B and W image. The image is coated with matte gel and painted with acrylic paint or as I discovered Copic markers work very well too.  

Later I added metal sentiments, (Tim Holtz sticks) and some bits of fabric.  Being the verbal person that I am...of course words need to be involved.


Tuesday, July 5, 2016

Welcome St. Dominic

And so it goes...another Caged Santos Doll.  And this time one of the large ones.  This is one of the dolls where the creation came first and the name second.  It started to be 'steampunk' but as she developed with the rulers, stars and other ephemera she became St Dominic, Patron Saint of astronomers.

Her metal looking finish is a series of paints and patinas over a basic black frame.  Lots of metals in the ribbon, charms and stars.
Add caption


Saturday, July 2, 2016

Back to Basics


Did I ever say I LOVE the Caged Santos Dolls from Retro Cafe Art?  Well I must as this is number five I think.  Sometimes I create and then find a Patron Saint to match the theme.  But this time I knew I was going to create St Francis of Assisi.  This medium sized doll, standing 10.5" tall is painted with a crackled white surface and antiqued in blue.

I added lots of nature related embellishments, leaves, flowers, butterflies, birds and yes even real acorns. Continuing my  goal of 'using the stash'  I have now moved to my jewelry box.  Being retired I infrequently wear much of the jewelry I've amassed.  On the back is a piece I used to wear frequently (think science teacher) 

The nest inside the cage has real bark and  a lovely blue bird.  I think St Francis would approve.

Friday, July 1, 2016

Getting My Pretty On

Try as I might, I have a hard time working in 'grunge' mode that I see in so much altered art and mixed media today.  I may have great plans and intentions but when it come to the composition, I seem to fall back on what I know best.  BUT luckily I usually love what I create.

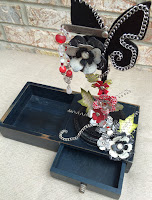
This is the third of the Retro Cafe Art butterfly stick stand-ups for me to finish.  As I said previously, I gave all three of them an paint undercoat and then they sat and sat and sat until I was healed and had some inspiration to finish them.  Now they're done.

This butterfly sits on a a circular base which is then glued to an old drawer-ed box. (Remember I like to produce things that are functional as well as pretty)

The box is approximately 10" wide
with the finished stand equally tall.
Loving the look of metal (my trademark) I decorated the piece with chain, wire and flowers made from sheet metal and Grunge Board.(Tim Holtz)

While my natural instinct was to keep the piece B and W, I decided it needed a pop of color.  And who doesn't love red?  I usually finish the back of my pieces for 360 degree enjoyment, but this one didn't seem to need it.  So the back is finished but not really decorated.


Thursday, June 30, 2016

A Side Track

Couldn't quite decide what I was going to do with the 3rd butterfly, so I fell back on another UFO (unfinished object).  As I said, I had a lot of Retro Cafe Art blanks assembled with a base coat of paint but no direction in which to go.

I started with the elevated ATC shrine from Retro Cafe Art, adhering it to a more substantial base and adding lots of stuff.  I had painted it it a basic white but knew it couldn't stay there.  Some blue paint, a little black wash, some gold accents on top of crackle paste gave it just the look I wanted.

I have long admired many of the art projects that are eclectic and really  "on the edge" but they're just not me.  I think this is a great compromise piece...me and where I'd like to go.

Closeup on inside shrine 
Side view to show bead chain.

 The shrine stands 10"  tall on her base.  Lots of antique gold and metal patina accent the shrine details..
Rear view.  I like to make them
360's providing interest on all sides.